Learning multiplication might seem tricky at first because it's a new math world. But if we stay positive and keep trying, it can be easier and quicker to understand its concept.
By applying these tips, the process of multiplication becomes much easier and even enjoyable.
Everyone learns in different ways, so it's good to use more than one method to help us get it, we shouldn't rely on just one method. That’s why we’ve put together 7 tips to help you learn or teach multiplication in a fun and visual way.
Learning multiplication with arrays is one of the best ways to visually understand the concept, they also help kids understand the concept of grouping, which is key to multiplication.
If we are learning using arrays, then we should consider using physical objects that we can easily manipulate. In this case, we are using imaginary kites to represent those objects.
Example 1: Let's work with 4 x 2.
We start by having 4 rows of 2 kites each.
- The rows represent the first factor 4.
- The columns represent the other factor 2.

Example 2: Now, let's work with 4 x 3.
This time we have 4 rows of 3 oranges each.
- The rows represent the first factor 4.
- The columns represent the other factor 3.
- By counting the oranges one by one we get the product 12.
In this case 3 (row 1) + 3 (row 2) + 3 (row 3) + 3 (row 4) = 12

Learning multiplication by using groups is also an effective way to visually understand the concept. Using groups can help reinforce our understanding and provide a clearer explanation.
We can also use physical objects to collect and group them into equal amounts to make it an interactive activity.
We can understand this multiplication by creating 2 groups, with 4 kites in each group.
- We have 2 groups that represent the first factor.
- There are 4 kites in each group, which represent the second factor.
- By counting all the kites in the groups, we’ll see that 2 groups of 4 objects equal 8, which is the result of 2 multiplied by 4.

We start by creating 4 groups with 5 oranges in each group.
- We have 4 groups that represent the first factor.
- There are 5 oranges in each group, which represent the second factor.
- By counting all the oranges in the groups, we’ll see that 4 groups of 5 objects equal 20, which is the result of 4 multiplied by 5.

To understand multiplication we have to think of it as just a shortcut for adding the same number many times, because that's what multiplication is, a repeated addition. It helps us understand multiplication as a faster way to add the same number multiple times.
Repeated addition is very helpful for working with small numbers and for building a solid understanding of how multiplication works.
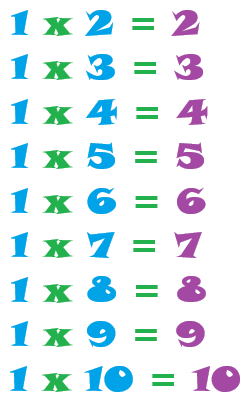
- Instead of writing 1 x 4 = 4, we can write 1 + 1 + 1 + 1 = 4.
- Instead of writing 1 x 7 = 7, we can write 1 + 1 + 1 + 1 + 1 + 1 + 1 = 7.
- We can continue adding the numbers until we get to 1 x 10 = 10 using the same method.

- To understand 7 x 2 = 14, we can write 7 + 7 = 14.
- Instead of writing 7 x 4 = 28, we can write 7 + 7 + 7 + 7 = 28.
- We can continue adding the numbers until we get to 7 x 12 = 84 using the same method.

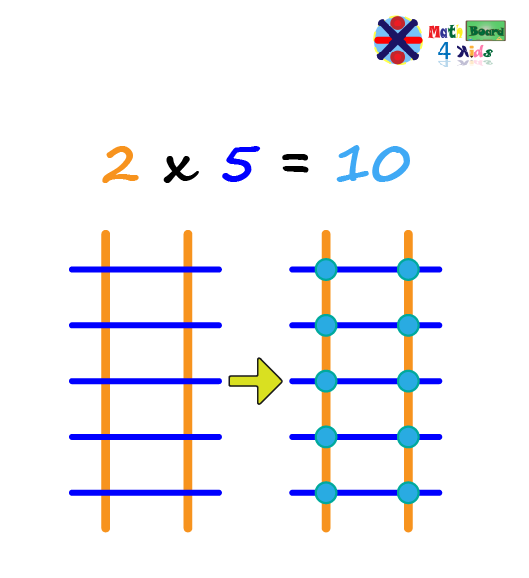
The concept of multiplication can also be easily learnt in a fun way using lines. This method helps us see how multiplication works by drawing lines to represent the numbers or factors we are working with.
By looking at how the lines intersect, we can find the product of multiplication.
We need to start by drawing vertical lines, and then draw horizontal lines. Then, we count the number of intersections where both the horizontal and vertical lines cross to find the result of the multiplication.
- There are 2 vertical lines that represent the first factor (2).
- Then, there are 5 horizontal lines, which represent the second factor (5).
- By counting all the intersections (dots), we find 10 intersections.
This time let's draw 4 diagonal lines, starting from the bottom left to the top right. Then, we draw 7 more diagonal lines, this time going from the top left to the bottom right.
- We have 4 diagonal lines that represent the first factor (4).
- We have 7 diagonal lines that represent the second factor (7).
- By counting all the intersections (dots), we’ll see that there are 28 intersetions, which is the result of 4 multiplied by 7.

The process of multiplying can also be visually explained by using number lines. It helps us understand multiplication easily using repeated patterns that anyone can understand.
Using number lines shows us that multiplication is simply skip counting by the same number, just like counting by twos, threes, or fives, basically, a repeated addition as we previously talked about.
- We start at 0 on the number line and make jumps of 4 units each, since 4 represents the first factor.
- We jump 3 times, because 3 is the second factor.
- Then, we can count the number we land on after the 3 jumps, which is 12.

- We start at 0 on the number line and make jumps of 4 units each, since 4 represents the first factor.
- We jump 2 times, because 2 is the second factor.
- Then, we can count the number we land on after the 2 jumps, which is 8.

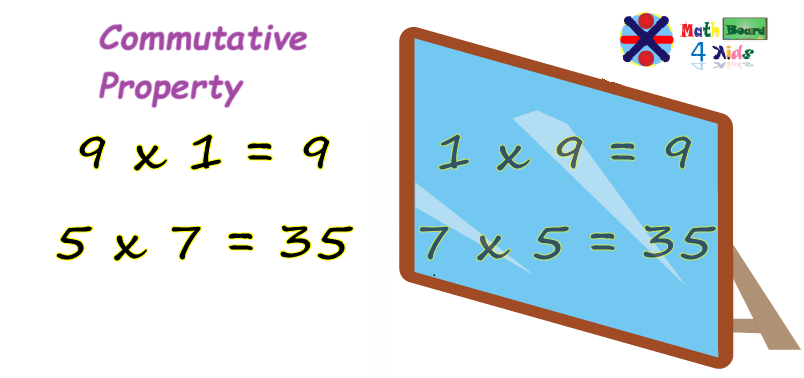
When we are learning addition and multiplication, understanding the concept of commutative property is essential, because it helps us learn to add or multiply better.
The commutative property states that the order of numbers, and sometimes, even operations, when multiplying or adding, does not affect the result or product. It is like a mirror, because we'd always get the same result regardless of how we arrange them.
- The first equation, 9 x 1 = 9 can be displayed as 1 x 9 = 9.
- The second equation, 5 x 7 = 35, can also be written as 7 x 5 = 35.
- The first equation, 7 x 2 = 14 can be displayed as 2 x 7 = 14.
- The second equation, 4 x 8 = 32, can also be written as 8 x 4 = 32.

When learning multiplication, using hands and fingers is a helpful and a very interactive way to make this learning process more tangible, memorable, and fun.
While there are different methods for learning multiplication tables using hands and fingers, we will focus on the times tables of 6, 7, 8, 9 and 10.
This method is only helpful for practicing the multiplication times tables of 6, 7, 8 and 9.
Step 1: For the first equation, (9 x 7 = 63), hold both hands in front of you, with all ten fingers extended.
Step 2: As shown in the picture, you have to assign each finger a value starting from 10 to 6 for both hands, you can write these values on your fingertips to make it more visual.
Step 3: Join the finger with the value 7 from one hand to the finger with the value 9 of the other hand.
Step 4: The values of the fingers above the joined fingers ( 7 and 9 ), represent units (values inside the blue circle), and the values of the fingers below, starting from the joined fingers ( 7 and 9 ), represent tens (values inside the blue square).
Step 5: Now, we have to multiply the values of the fingers on the left inside the circle (units), to the values of the fingers on the right inside the same circle (units) to get 3 x 1 = 3.
Step 6: Then, we need to count how many fingers starting from the joined fingers ( 7 and 9 ), there are inside the blue square (tens), in this case, there are 6 fingers, so that means it is 60, because each finger inside the blue square (tens), represents a ten.
Step 7: Finally, we add both results, 3 (units) + 60 (tens), to get 63. So, that means that 9 x 7 = 63.
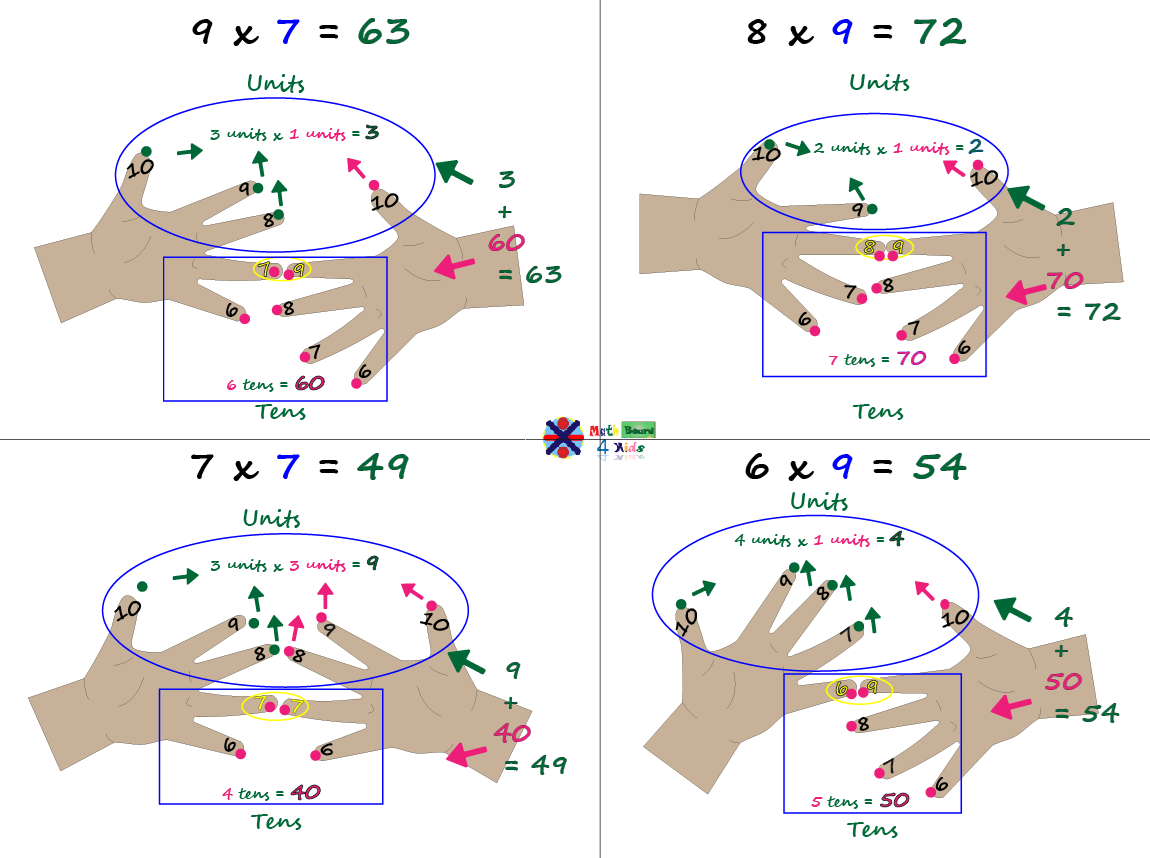
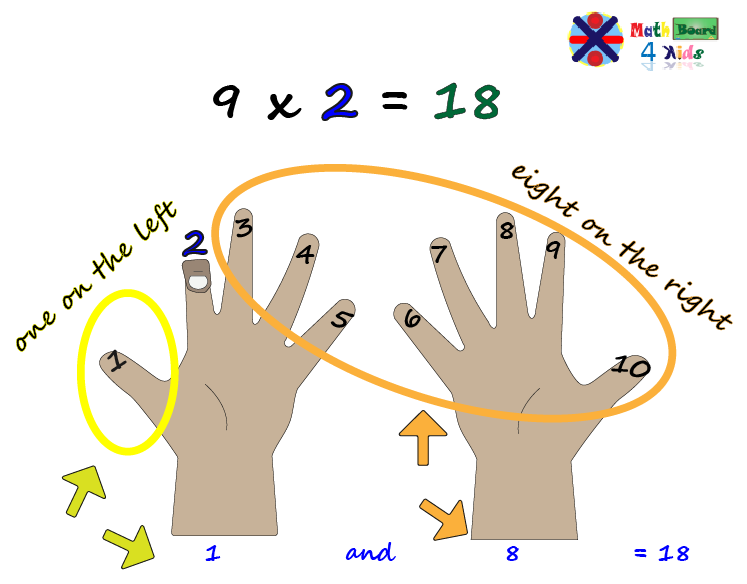
For this example, let's work with (9 x 4 = 36)
Step 1: Hold both hands in front of you, with all ten fingers extended.
Step 2: This time we have to assign each finger a value starting from 1 to 10. You can write these values on your fingertips to make it more visual.
Step 3: The rule is that for any number from 1 to 10 that we want multiply by 9, we have to bend down that finger (to represent the value).
Step 4: Since we are working with the number 4, we have to bend down the finger with the value 4.
Step 5: The number of fingers to the left of the bent finger (4), represents the tens, and the number of fingers to the right represents the ones.
Step 6: Then, we'll see there are 3 fingers on the left of the bent finger 4, so, it means we have 3 tens here.
Step 7: We can also see that we have 6 fingers on the right, representing 6 units. Then, we can then say that, 3 tens + 6 units = 36. Therefore, 9 x 4 = 36.
